Touching cloth
Photographing fabrics is one of my specialties. It’s a discipline that involves a multitude of lights, some specific equipment which is fit for purpose, and most importantly, a fabric stylist with years of exoerience, a natural flair for making all manner of cloth look like it has fallen into place naturally, and a daily fee which would make the royal family wince. There are three examples here. The first was actually done without the aid of any stylist. I am generally asked to provide 2 or 3 complete shots per fabric – one which is completely flat & evenly lit, one with a set of waves running at an angle across the face of the fabric showing the texture, and a final image shot close-up with the dtail, and texture really emphasized.


There are times when I don’t have a nice big length of material on a roll to work with, so it’s often necessary to get imaginative. Trying to get waves into a 12 inch square of hession is certainly a challenge.
I had a good roll to work with here. The first job is to hng it over clothes rail and steam it with a commercial steamer to eliminate any folds or creases. This can be a lengthy process if I’ve been given a folded bit of material. Clients think that folding it up makes it easier to transport. The material is then shot square on. I sometimes shoot it on a flat board to get the initial image out of the way. Lighting needs to be consistent over the whole bit of fabric, so it tends to be comprised of two big softboxes aimed down at 45 degree angles.
The wavy shot is achieved either by putting a layer of something underneath the fabric to create folds, or simply by pinching it gently to form peaks and troughs across the frame. Alternatively, if it’s a bigger sample, I hang it over the clothes rail again, and push it together along the top of the rail to make waves along the fabric. The light needs to be a bit more directional to emphasize shadow and highlight, without making things too contrasty. A single softbox, or parabolic umbrella skimmed across the fabric provides the key light, with a white reflector filling in the hard shadow areas. I generally use a Nikon D800, and a pin-sharp 60mm Micro lens to produce beautiful files suitable for posters ( which is generally their intended use).
One thing to watch out for when shooting these fabrics is the phenomenon of moire. This is an effect of coloured bands of interference patterns created due to the size of sensor pixels compared to the size of the visible texture in the fabric. The anti-aliasing filters in most digital cameras keeps it at bay, but if it becomes an issue, you can eliminate it by either changing the distance between subject and camera, or using a different focal length/lens.
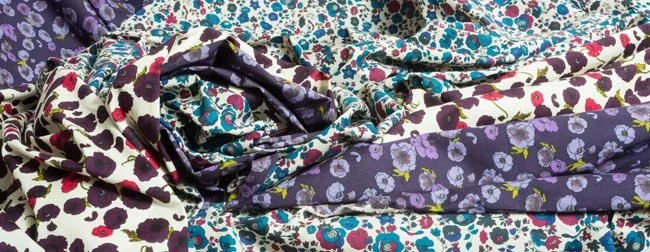
The next three shots were produced for a fashion lookbook for my long term client Barbour in South Shields. They’re all Liberty prints used in the lining of many of the contemporary wax jackets. I knew that this was way beyond my limited styling capabilities, so I called upon my trusted, and spectacularly talented styling guru Vikky Johnston. What she doesn’t know about working with cloth isn’t worth knowing. I built a set against the wall, got my simple lighting in using autopoles, and let her loose with the various fabrics. We did a few test shots to get an idea of what ws needed, and sent them to the client for draft approval. Once we had the green light for the styling, it was a simple case of doing each fabric group one at a time. It took best part of a day to set up and shoot.
Once the images were approved, they went straight to the design house which was preparing the printwork. The fabric came from working stock worth thousands of pounds, so it had to be rolled up carefully, and transported back to the client before the end of the day. I shot hundreds of images like these over the years, but it never became routine.